In this article (7 sections)
Easy DIY Lighted Ghost Wreath for Halloween: A Pottery Barn–Inspired Look
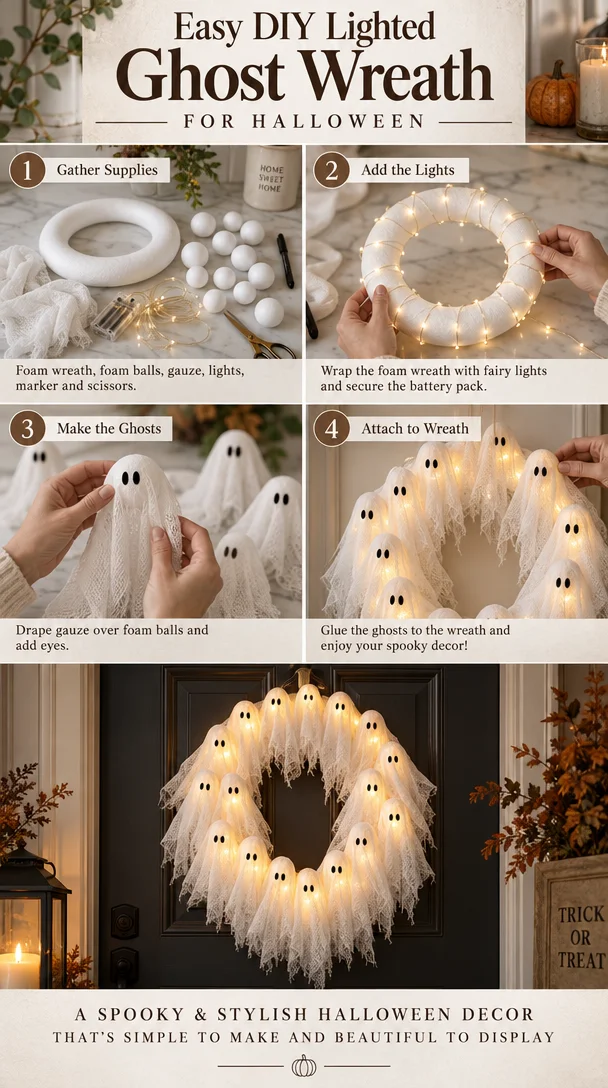
A glowing ghost wreath is a playful way to dress up your front door for Halloween without making your porch feel too spooky. With soft white fabric, a simple wreath form, and warm fairy lights, you can create a charming decoration that captures a polished, boutique-inspired look on a DIY budget.
This version pairs an illuminated wreath with a friendly fabric ghost that floats in the center. It’s easy to customize, lightweight enough to hang, and just as cute above a mantel as it is on a covered front porch.
Project at a Glance
- Skill level: Beginner
- Hands-on time: About 45–60 minutes
- Style: Soft, whimsical Halloween decor
- Best placement: Indoors or on a sheltered porch, depending on your materials
Supplies You’ll Need
- A 14- to 18-inch wire wreath frame
- White gauze, cheesecloth, or lightweight white fabric
- Battery-operated LED fairy lights
- A 3- to 4-inch foam ball
- Black felt
- White yarn or strong thread
- Clear fishing line
- Floral wire or small zip ties
- Scissors
- Low-temperature hot glue gun and glue sticks
- Ribbon or a wreath hanger
Choose warm-white lights for a cozy glow or cool-white lights for a more ghostly effect. A timer function is especially handy if you want the wreath to light up each evening without taking it off the door.
Safety note: Use LEDs rather than lights that run hot. For a covered outdoor location, choose lights and a battery pack rated for that use. Keep fabric away from candles, heaters, and other heat sources.
How to Make a Lighted Ghost Wreath
1. Cover the Wreath Frame
Cut your white fabric into long strips about 3–4 inches wide. Wrap them loosely around the frame, overlapping as you go until the wire is mostly hidden.
Secure the ends with small dots of hot glue or short lengths of white yarn. Keep the wrapping soft rather than tightly stretched; slight folds give the wreath texture and help diffuse the light.
For a wispy finish, let a few gauzy edges remain loose around the outside.
2. Add the Fairy Lights
Wind the fairy lights evenly around the covered wreath form. Secure the wire with small ties where needed, taking care not to pinch or damage it.
Position the battery pack at the back near the bottom or side of the wreath. Attach it firmly with floral wire or zip ties, but leave the switch and battery compartment accessible.
Turn the lights on before continuing. Adjust any dark spots or crowded sections while the wire is still easy to move.
If you prefer a softer glow, loosely tuck a thin layer of gauze over parts of the light strand. Don’t tightly bundle the strand or cover the battery pack.
3. Shape the Ghost
Cut a square of white fabric approximately 24–30 inches across. Drape it over the foam ball, keeping the ball near the center.
Gather the fabric just below the ball and tie it gently with white yarn. This creates the ghost’s head while allowing the remaining fabric to fall into a flowing body.
Hold the ghost inside the wreath opening to check its size. Trim the bottom if necessary, leaving an uneven hem for a floaty finish. A little fabric hanging below the wreath can look especially charming.
For a fuller ghost, layer cheesecloth over a piece of thin, opaque white fabric.
4. Give Your Ghost a Face
Cut two small oval eyes from black felt. Add a tiny oval mouth if you want a classic “boo” expression.
Arrange the pieces before gluing them down. Eyes set slightly wide apart create a sweet, friendly look, while longer ovals make the face a little more dramatic.
Use just enough low-temperature hot glue to secure each piece. Keeping the face simple helps the finished wreath feel clean and intentional.
5. Suspend the Ghost in the Center
Tie clear fishing line securely around the gathered fabric beneath the ghost’s head. Run the line behind the head and attach it to the top of the wreath frame.
Adjust the length until the ghost sits comfortably within the opening. Its head should be visible without covering too much of the illuminated ring.
If the ghost swings or turns, use two additional loose ties to secure the fabric lightly to the sides of the frame. Conceal those attachment points beneath the folds.
6. Add a Hanger and Finish the Shape
Attach a sturdy ribbon loop to the frame or place the wreath on a suitable wreath hanger. Make sure the hanger supports the frame itself—not just the fabric wrapping.
Hang the wreath, switch on the lights, and step back. Fluff the fabric, straighten the ghost’s face, and tuck away any visible wire or ties.
Tips for a Boutique-Inspired Finish
The difference between a rushed craft and a polished decoration often comes down to restraint.
- Stick to a small color palette. White fabric, black facial features, and a soft glow are enough.
- Mix textures subtly. Smooth fabric beneath airy cheesecloth adds depth without clutter.
- Keep the lights balanced. Even spacing makes the wreath look thoughtfully finished.
- Hide the hardware. Conceal ties, glue spots, and the battery pack from the front.
- Skip oversized embellishments. If you add a bow, keep it small so the ghost remains the focal point.
Easy Ways to Customize Your Wreath
Make It Extra Friendly
Use round felt eyes and a little curved smile. Pair the wreath with painted pumpkins and simple porch decor for a cheerful Halloween display.
Give It a Vintage Feel
Choose ivory fabric, warm-white lights, and a narrow black velvet ribbon. The softer contrast works well with antique-style lanterns and muted autumn colors.
Add More Movement
Tie a few narrow cheesecloth strips along the bottom of the frame. Keep them short enough that they won’t catch in the door or interfere with the handle.
Create a Smaller Indoor Version
Use a smaller wreath form and scale down the ghost. Hang it in an entryway, above a console table, or against a mirror where the lights can reflect.
Display and Storage Tips
This fabric wreath is best kept out of rain and strong wind. Even when the lights are outdoor-rated, gauze can absorb moisture and lose its shape. An indoor wall or well-protected entryway is usually the easiest placement.
Before hanging it on a working door, check that the battery pack doesn’t prevent the door from closing properly.
After Halloween, remove the batteries and store the wreath in a roomy box. Lightly support the ghost’s head and fabric with tissue paper rather than flattening everything beneath other decorations.
A Little Glow Goes a Long Way
You don’t need elaborate supplies to make Halloween decor feel special. A simple white wreath, a friendly ghost, and a strand of tiny lights create a welcoming display with plenty of personality.
Keep it minimal, let the fabric fall naturally, and enjoy a handmade Halloween accent that brings a soft glow to spooky season.