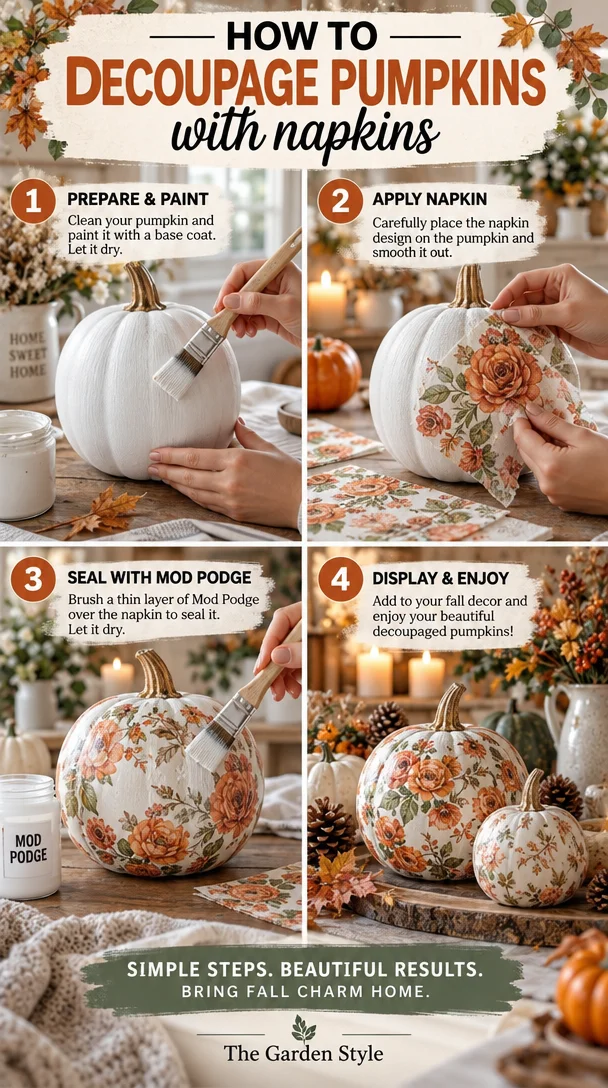
How to Decoupage Pumpkins With Napkins and Mod Podge
Give your fall decorations a softer look with pumpkins covered in delicate floral designs. Using patterned paper napkins and Mod Podge, you can turn an ordinary pumpkin into a charming autumn accent—no detailed painting skills required.
Choose muted flowers, golden leaves, or tiny botanical prints for a finish that feels cozy rather than spooky. This easy project works especially well with faux pumpkins you can bring out year after year.
Supplies You’ll Need
- A smooth faux pumpkin or a firm, unblemished real pumpkin
- Paper napkins with fall floral or botanical patterns
- Matte Mod Podge
- A soft paintbrush or foam brush
- Scissors
- White or cream acrylic paint, if needed
- A clean cloth
- Wax paper or another protective covering for your work surface
1. Clean and Prepare the Pumpkin
Wipe the pumpkin with a damp cloth to remove dust and dirt, then let it dry completely. If you’re using a real pumpkin, avoid any with soft spots, cracks, or damaged skin.
Light-colored pumpkins make the best base because thin napkin paper becomes slightly translucent when glued down. If your pumpkin is bright orange or dark-colored, paint it white or cream first. Let the paint dry thoroughly before continuing.
2. Separate the Napkin Layers
Most decorative napkins have two or three layers. Carefully peel away the plain backing layers, keeping only the thin, printed top layer.
This step helps the paper conform to the pumpkin’s curves without creating thick edges.
Cut out individual flowers and leaves for a scattered arrangement, or tear around the motifs for softer edges that blend into the background. Smaller pieces are easier to apply around the pumpkin’s ridges than one large sheet.
3. Plan Your Floral Design
Before opening the Mod Podge, decide where you want the main flowers to sit. You might cluster them around the stem, trail them down one side, or scatter them across the entire surface.
Leave some of the pumpkin visible for an airy finish. A few well-placed blooms can be just as effective as an all-over pattern.
4. Apply a Thin Layer of Mod Podge
Brush a thin, even coat of Mod Podge onto a small section of the pumpkin. Work on one area at a time so the adhesive doesn’t dry before you add the paper.
Gently lay a napkin piece onto the wet adhesive. Start near the center of the motif and lightly smooth outward with a soft brush. Use very little pressure—the paper becomes fragile when wet.
A few small wrinkles are normal and add to the handmade look. Avoid repeatedly brushing the same spot, which can tear the napkin.
5. Build the Pattern Gradually
Continue adding floral pieces, working around the pumpkin in manageable sections. Slightly overlap edges where you want a fuller arrangement.
For deeper grooves, use smaller motifs or make a tiny cut in the edge of the paper to help it settle around the curve. If a piece tears, let the area dry and cover the gap with a small matching flower or leaf.
Allow the decorated sections to dry before handling them or turning the pumpkin to reach another side.
6. Seal and Let Dry
Once the napkin pieces are attached and dry, gently brush a thin coat of Mod Podge over the decorated surface to seal it. Avoid leaving heavy puddles in the grooves.
Let the pumpkin dry on a protected surface with good airflow. Follow the drying and curing guidance on your Mod Podge label before packing, stacking, or placing it against other decorations.
Tips for a Soft, Seasonal Finish
- Choose a gentle palette. Cream, dusty rose, sage green, rust, and muted gold create a warm autumn feel.
- Use matte Mod Podge. It gives the finished pumpkin a low-shine appearance.
- Mix motif sizes. Pair larger blossoms with small leaves to fill awkward spaces.
- Keep the stem simple. Leave it natural or add a loose ribbon bow after everything has dried.
- Display indoors. Standard Mod Podge is not waterproof, so keep your pumpkin away from rain and moisture.
Decorating With Your Finished Pumpkins
Arrange your decoupaged pumpkins on a mantel with candles and dried foliage, or group them on a dining table with linen and wood accents. Mixing different pumpkin sizes while repeating the same napkin pattern creates a coordinated display.
For real pumpkins, check regularly for deterioration and discard them when they begin to soften or mold; decoupage does not prevent spoilage. Faux pumpkins can be stored once fully cured, ready to bring their floral charm to another fall season.